Cryohandling is still cool right?
So, you have done your research and optimised your freezing and thawing protocols, but are your samples are safe?
By the most part the answer to that is yes, providing the storage unit is doing its job correctly. But what about all the times that storage unit is accessed? How many times has that tray containing your samples been placed on dry ice or even straight on to a work bench while somebody roots around inside looking that one sample that is labelled with a pen and is now barely readable. Each time this happens the temperature of your samples change. Granted I am looking at the worst-case scenario there and it’s mainly to make a point – most people that handle cryogenic samples do it well, however not everyone considers the small things when it comes to cryo-handling. How many times have people just got a tray out of storage and not bothered keeping it at temperature because “I’ll just be quick!”. Great care is taken in producing samples, whether it be cell lines or some other biological material, and then a protocol for freezing is followed, but once they are stored and frozen its just assumed it will be ok, providing they aren’t left out to thaw. Is that really the case?
What I’m going to talk about in this blog is the little changes and differences that can be made to everyday cryo-handling to ensure better sample integrity. Most people reading this will consider most of it as common sense, however after seeing some bad practises first-hand and speaking with some other people – even though most of it is common sense, in some cases people still fail to follow it.

Let’s start at the beginning – labelling!
Trying to write on 20 tiny plastic tubes with a permanent marker is not the easiest thing to do. Now if you don’t hold many samples, I can completely understand not wanting to fork out £300 for a label maker. But see it as a little investment, and for anyone who stores a lot of samples I would say it a necessity. Especially for any samples that are going to be stored for a long period of time. I have first-hand experience of trying to decipher handwritten vials that were frozen in the 90s, they were written with a pen that was only semi-permanent! Standardised labelling helps out in the long run too. If you have the sample name and other vital pieces of information in the same place on every label, you know where to look when retrieving a vial from storage (when samples are out of storage units, every second counts!). Also, it is worth checking that the labels are fit for storage in LN2 – you don’t want to go to all that effort of making a world class label to have it fall off the vial, do you? Some people prefer barcoded labels but for this to work you need to have an inventory system that works with barcode etc. The main message here though is simply, quick identification of samples! There’s no point making it hard for ourselves.
Location, location, location!
Your samples are now frozen (I’m not going to go into freezing protocols as they are readily available online) – it is worth thinking about how often you will need access to your samples. For instance, if the samples are being stored for archive purposes do you really want them in a frequently used tray or rack? Depending on how much space you have available segregating certain areas of storage units or even a whole storage unit itself to hold archive or high value samples will reduce the amount of times those samples are exposed to temperature changes. It also reduces the risk of someone taking one by mistake.
Put the rest back!
You have come to retrieve a sample you need to thaw, so you lift the large rack out of the storage unit which contains hundreds of samples. You place it down, grab your box and start searching for your sample… do you put the rack back while you do this because you’ll only be quick. Surely it takes more time to faff around trying to get the locking rod back in the rack and getting it back in the freezer than it does to find your samples in your tray? Well consider this, your sample takes a little longer to find, or someone comes and distracts you, this whole time all those other samples are warming! There was some work done by Brooks Life Sciences (Thermal excursions of cryogenically frozen vials and the risk of rising about Tg,H2O) that shows water stored at -173°C will warm past the glass transition phase (approx. -135°C) within 1 minute! Continually passing through this point can lower viability and cause cell stress. Now, how do you stop your samples passing through this point because surely retrieving a sample in less than a minute is surely impossible? Well for most people anyway.
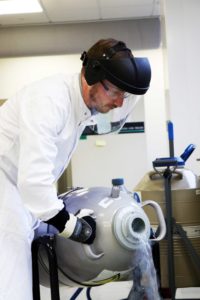
That being said, here are a few ideas that reduce this risk to the samples. We made a few changes to our standard racks that we use – rather than purchasing ones with locking rods, which takes time to remove and can be fiddly, we purchased push lock racks (they have a small metal spring which holds the tray in place). This means we can lift the rack out of the storage unit, pull out the tray we need and place the rack straight back into the freezer with no fiddling! So that’s the rack full of samples safe but what about the tray I’m now holding? The answer…CryoPods! Now normally I would generally suggest an item that can be purchased from multiple suppliers however CryoPods are made by Brooks/Biocision and I haven’t seen anything else really on the market like them (if you do find something please feel free to email us at Cryoniss). They are charged with LN2 and have a small workable area that will stay below -180°C for a good few hours. This means you can search trays for samples and not have to worry about your samples warming! They also have a lid and handle, so they are good for local transportation, which is quite handy, but when full they are heavy to carry over long distances. I will just make the point of saying when I say local transportation, I mean between labs on the same site… they are not suitable to be sent offsite when charged and holding samples!
If you wouldn’t lick it, don’t touch it!
Now I’m sure we have all seen that scene from Dumb and Dumber where he gets his tongue stuck to the post…well your samples are much much colder! Now I’m not suggesting that people are licking samples, but people do touch them. Yes, I know the chances of them sticking to your fingers is pretty slim but that isn’t the issue here. Your fingers are warm, touching samples actually heats them up. If a sample warms through the glass transition phase after 1 min in the air, imagine how much faster it’ll be in your hand! Please use tweezers – they are cheap to buy, and they don’t cause any unwanted heating.
Like I said…it’s all common sense!
Reading this, most people will not have learnt anything new but hopefully will consider the little things that can affect your samples more than what they did before. Like I said, all that effort goes into producing these samples and the experiments they are used in, it would be a shame to use samples that are not quality! I understand I probably care a little more about this than your average person (otherwise I wouldn’t have started a biological sample storage company) but like anything in life, you need to start with a good, quality foundation and the reagents you use are that foundation. So make sure they are good!
Of course you wouldn’t have to worry about any of this if you stored your samples with Cryoniss… I just thought I’d throw that in there.
I hope you have all enjoyed reading this and if you have, I’ll try and think of a few more topics to write about in the future. Be sure to keep checking our site for blogs by our team and even some guest ones too! I feel this is where I should sign off with some cheesy line… so here we go…
Keep it cool!


